Hot to connect to your Hypeclip Comet robot arm (PhoPrint compatible)
Having a short or long ‘Hypeclip Comet’ robot arm from Hypeclip.com? This is your place. First, check out the manuals and ensure the stand, robot arm and camera are correctly installed and positioned.
Prerequisites:
- iPad or iPhone – Download the GlambotApp from the Apple Store
- Lightning or USB-C HUB with an ethernet port connection (preferably with an HDMI port for a slideshow cast)
- Router with at least 4 ethernet connection ports
- Ethernet cable of 16 feet (5 m) and ethernet cable of 10 feet (3 m)
- Robot arm accessories
STEP 1, Hardware setup:
When you purchase a ‘Hypeclip Comet’ robot, you will receive:
- The robot; has a cable attached to it that must be connected to the controller.
- The power cable; delivers power to the controller.
- The emergency stop button; should be connected for the Robot Arm to work. Pressing the button forces the robot to stop moving. It comes pressed by default, make sure to release it when mounting.
- The controller; is the head of all operations. It has the power button and the ports to connect the robot cable and the emergency stop cable. It also has two ethernet ports and two USB ports.
This is how the setup should look after mounting the robot.
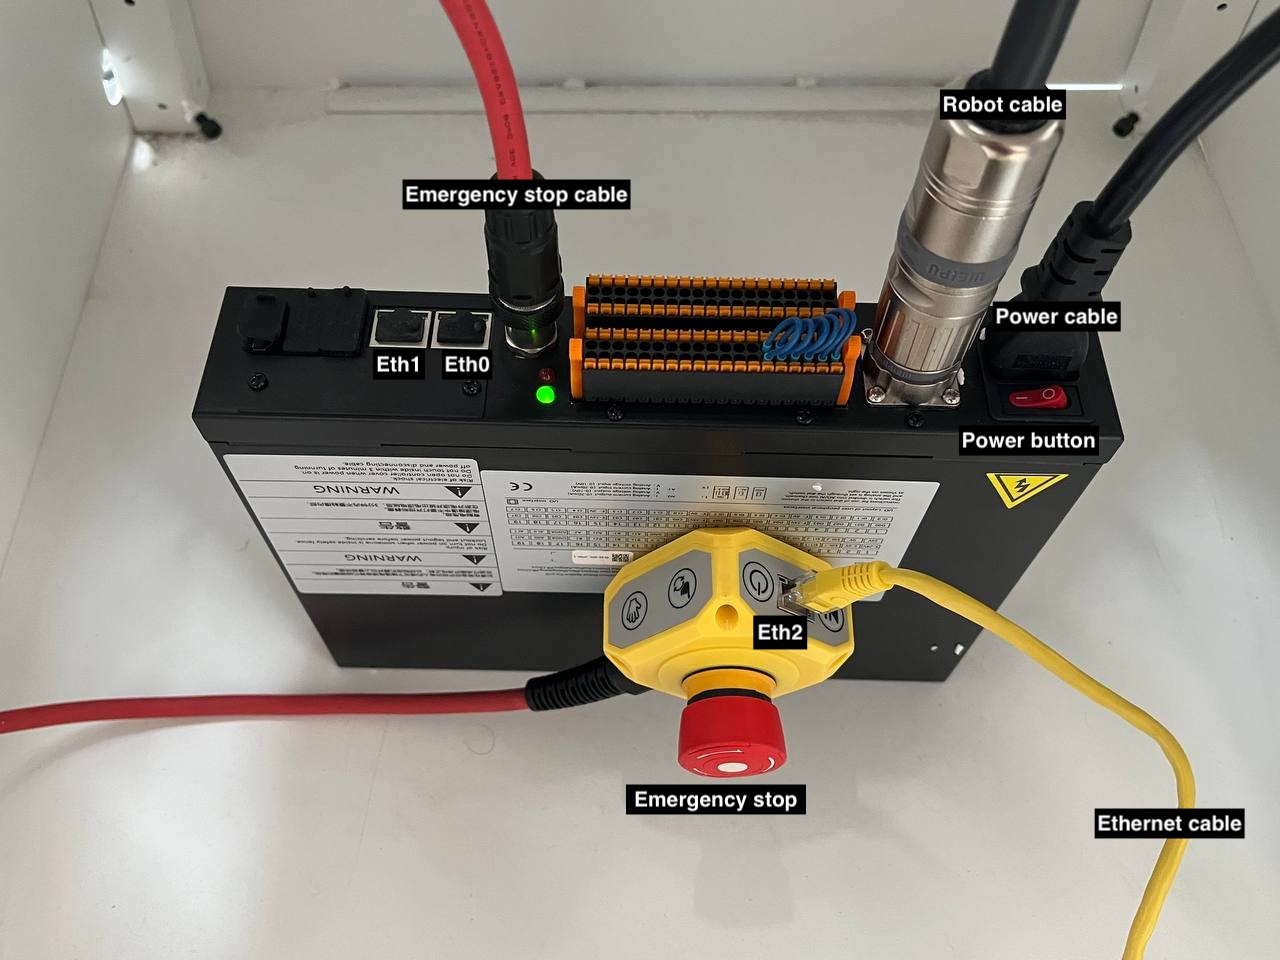
Very important: If you are not willing to connect the cable to Eth2, you can also connect it to Eth0, but the connection IP will change. Check the details below.
This robot does not support a wireless connection, since adding a WiFi dongle to the USB ports does not create a local network. Then, to share your media to venue attendees you’ll require a router or to use Airdrop. Setting up the wired connection is simple:
- Get a router with 4 ethernet ports.
- Get an ethernet cable and plug one of the ends into the “Controller”(Eth0) or the “Emergency stop” (Eth2, recommended), then plug the other into the router’s ethernet port (make sure you do not connect it to the “internet” ethernet port).
- Get another ethernet cable, plug one of the ends into the router, and then, plug the other end into your USB C hub for the iPad.
- If you’re using a Z Cam, get another ethernet cable, put one end into the router’s ethernet port, then, place the other end into the Z Cam’s port.
- (Optional) If you want to add a Sharing box, place one end of an ethernet cable into the Sharing box’s ethernet port. Then, place the other end into the router’s ethernet port (make sure you do not connect it to the “internet” ethernet port).
- (Optional) Connect your router to the internet by placing the internet ethernet cable into the router’s internet port OR set up your router as an “Access Point” or “Switch”. This way you can connect your router to another wireless network while managing the local cable connections.
After everything is wired and turned on, connect the USB hub to your iPad. Head to your iPad’s settings and tap on “Ethernet”, then the port. Set the IP to manual and write the following:
- Connected to Eth0 or Eth1:
- IP: 192.168.57.10
- Subnet Mask: 255.255.0.0 or 255.255.255.0
- Connected to Eth2:
- IP: 192.168.58.10
- Subnet Mask: 255.255.0.0 or 255.255.255.0
———————————————————————————————–
STEP 2, robot settings:
- Open any browser on your iPad and navigate to “192.168.57.2” (Eth0 and Eth1) or “192.168.58.2” (Eth2) you saw in the ethernet settings (previous step).
- Insert the default login credentials “admin” for the user and “123” for the password to edit the robot settings.
- Head to “Settings/General” and turn off the “Teach pendant enabled” toggle.
- Head to “Initialize” > “Robot Settings” > “Tool coord.”, then set the “Coordinate system name” to “toolcoord0” and apply the changes.
- Head to “Initialize” > “Robot Settings” > “Speed scaling”, then set it to 100%. You can later modify the speed from the GlambotApp settings.
———————————————————————————————–
STEP 3, GlambotApp setup:
To connect to the robot, just turn “on” the robot controller and wait until the controller robot’s ring of LEDs is green. After, open the GlambotApp:
- Tap on the left bottom button and tap on “Robot Arm Settings”.
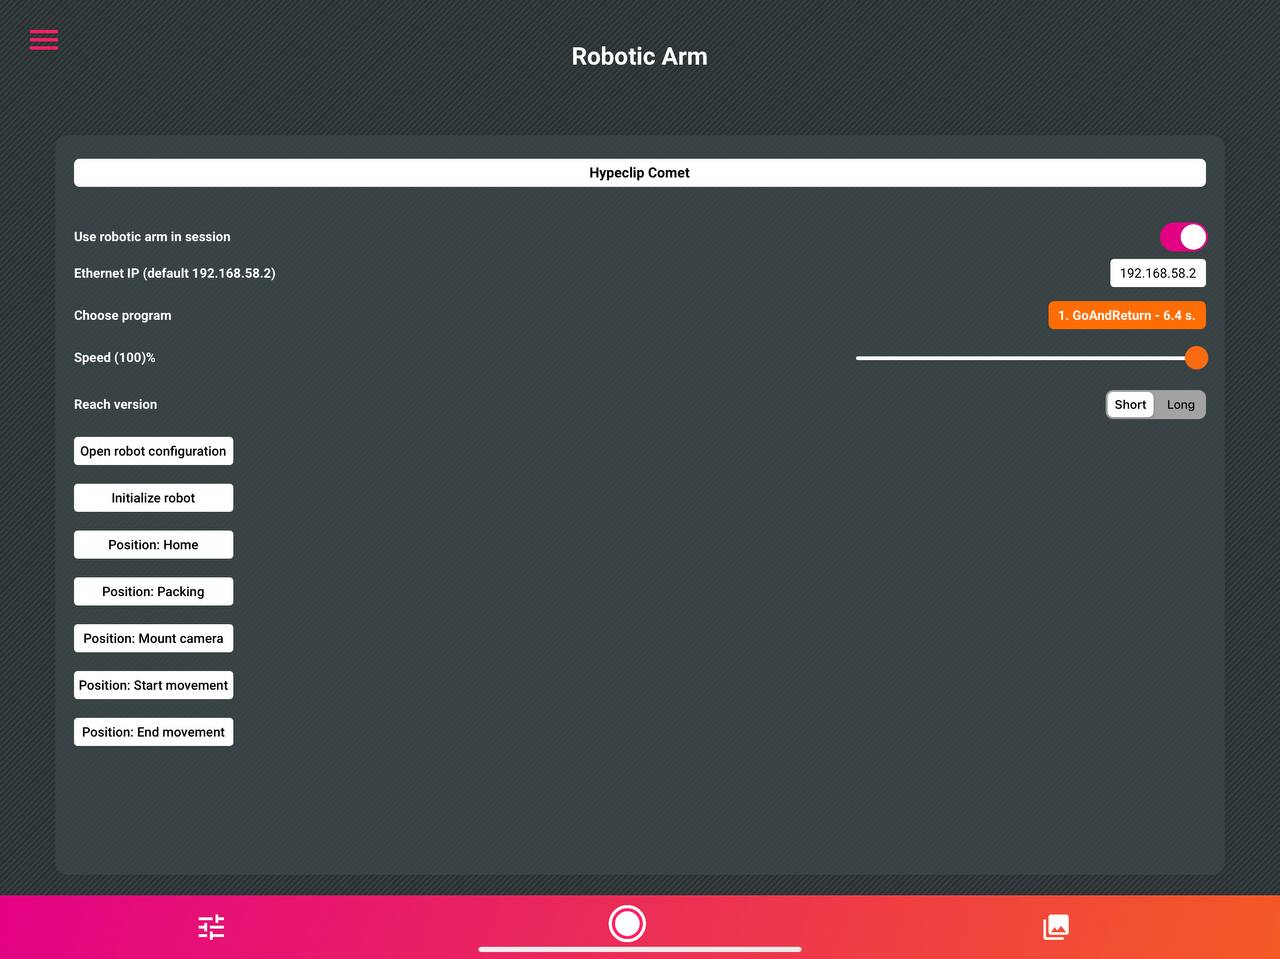
- On that screen, select “Hypeclip Comet” from the scrollable menu and turn “on” the “Use robotic arm” toggle.
- Set the Ethernet IP to “192.168.58.2” if connected through Eth2 or “192.168.57.2” if connected through Eth0 or Eth1.
- Tap on “Initialize Robot”.
Select the program moves you are interested in and try these movements using the start movement and end movement buttons.