How to connect to your Dobot Nova 5 Robot Arm to the GlambotApp
Do you have a Dobot Nova 5 Robot Arm set from Hypeclip.com? Check out the manual to make sure the stand, robot arm and camera are correctly installed and positioned.
Prerequisites:
- iPad or iPhone – Download the CRStudio app and the GlambotApp
- Lightning or USB-C HUB with an ethernet port connection (preferably with HDMI for a slideshow)
- (Wired connection) Router with at least 4 ethernet connection ports
- (Wired connection) Ethernet cable of 16 feet and ethernet cable of 10ft
- Dobot Nova 5 plus accessories
STEP 1, Hardware setup:
When you purchase a Dobot Nova 5 robot, you will receive:
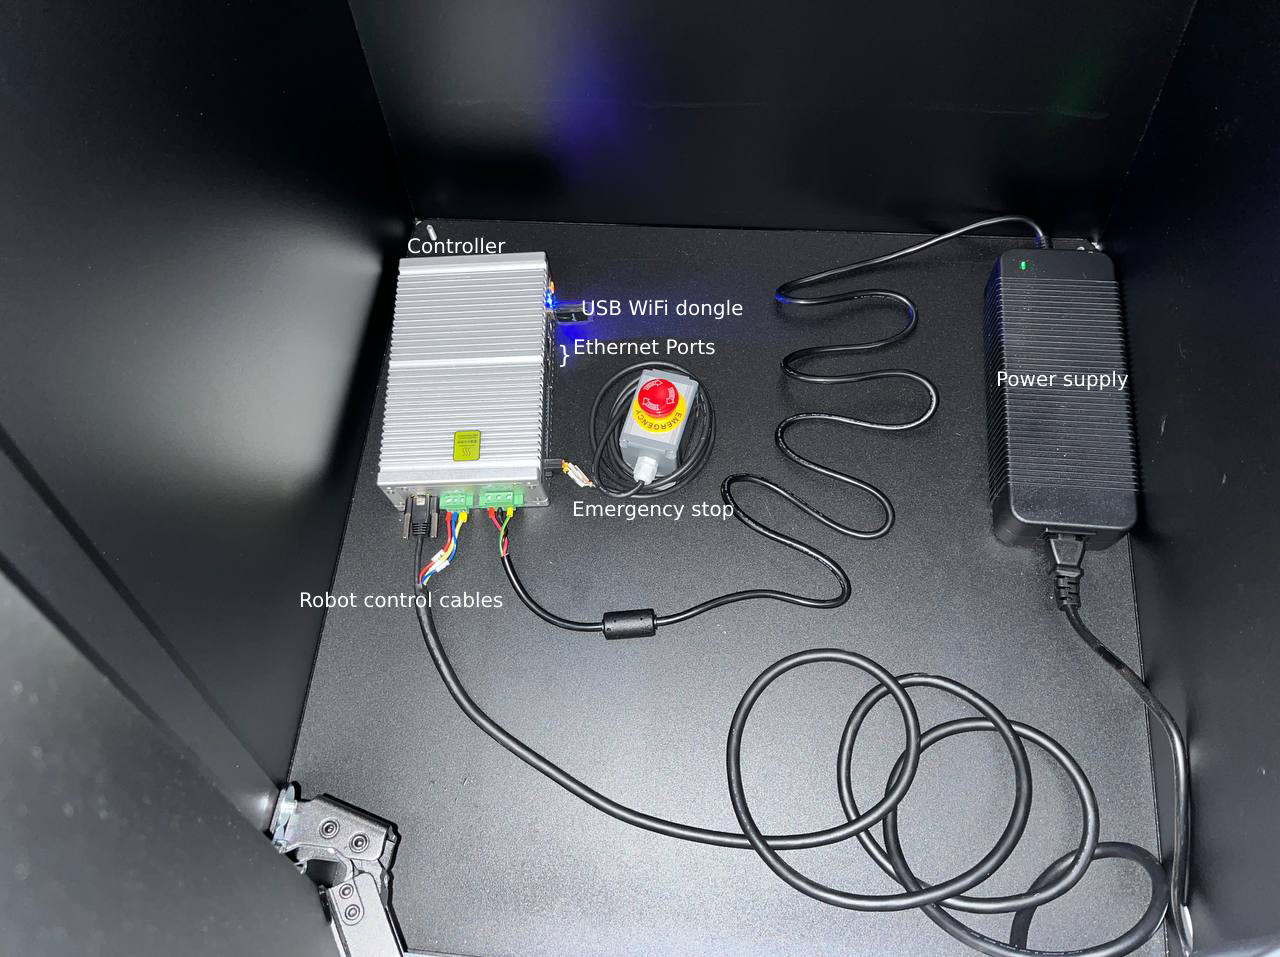
- The robot; has a cable attached to it that must be connected to the controller.
- The power supply; delivers power to the controller.
- The emergency stop button; should be connected for the Robot Arm to work. Pressing the button forces the robot to stop moving. It comes pressed by default, make sure to release it when mounting.
- The controller; has ethernet and USB ports for internet and control connections. Also the robot control port and the emergency stop port.
This is how the setup should look after mounting the robot for a wireless connection. For a wired connection please check the steps below.
If you want to share your videos you’ll need to free up your WiFi or connect yourself via ethernet to a router. Setting up the wired connection is easy. This is how:
- Get a router with 4 ethernet ports
- Get an ethernet cable and plug one of the ends into the “Controller”(port 1), then plug the other into the router’s ethernet port (make sure you do not connect it to the “internet” ethernet port).
- Get another ethernet cable, plug one of the ends into the router, and then, plug the other end into your USB C hub for the iPad.
- If you’re using a Z Cam, get another ethernet cable, put one end into the router’s ethernet port, then, place the other end into the Z Cam’s port.
- (Optional) If you want to add a Sharing box, place one end of an ethernet cable into the Sharing box’s ethernet port. Then, place the other end into the router’s ethernet port (make sure you do not connect it to the “internet” ethernet port).
After everything is wired and turned on, connect the USB hub to your iPad. Head to your iPad’s settings and tap on “Ethernet”, then the port. Check your IP address and the routers IP address. The routers IP address should be “192.168.X.1”.
- Open any browser on your iPad and navigate to the routers IP address you saw in the ethernet settings.
- Insert your router user and password to edit the router’s settings.
- Head to “LAN”/”Network” and change your routers IP address to
192.168.0.1, then, reboot the router. Note: The “0” subnet is needed to be able to connect wired to your Dobot Nova robot. - (Optional) Connect your router to the internet by placing the internet ethernet cable into the router’s internet port OR set up your router as an “Access Point” or “Switch”. This way you can connect your router to another wireless network while managing the local cable connections.
———————————————————————————————–
STEP 2, CRStudio setup:
- Install CRStudio App: Navigate to the App Store on your iPad and download the CRStudio app.
- Connect WiFi Dongle: Insert the WiFi dongle into the control box of your Dobot Nova 5 robot arm.
- WiFi Connection: On your device, go to the WiFi settings and connect to the network that includes “Dobot_Wifi” in its name.
- Enter Password: You can find the WiFi password in the robot arm’s user manual, which is by default
1234567890. - Connect to the Robot: Open the CRStudio app and tap on “Connect” at the top of the screen to establish a connection with your robot arm.
- Make sure your physical “Emergency button” is not pressed. When moving it around it gets pressed easily.
- WARNING, control the robot from the CRStudio App: If your robot has been already configured in the past, you won’t be able to change settings from the CRStudio app. First, head to “Settings” > “Remote Control” setup screen and set the “Current working mode” to “App-Online”, then tap “Save”.
- Prepare your robot for possible wired connections: Head to “Settings” > “Software settings”. On the “IP Setting” section, set the IP to “Manual”. Then, set
192.168.0.110as “IP address” and255.255.255.0as” Subnet Mask”. - To increase your robot arm speed, follow steps from 6 forward from our “speed up your Dobot Nova 5” tutorial.
- To control the robot from the GlambotApp: Head to “Settings” > “Remote Control” and set the “Current working mode” to “TCP/IP secondary development”, then tap “Save”.

———————————————————————————————–
STEP 3, GlambotApp setup:

– Wireless
To connect wirelessly to the robot, turn ‘on’ the robot controller, wait until the controller LED is solid blue, and then, join the Dobot WiFi using your wifi settings on the iPad. The password of this WiFi is by default 1234567890. After connecting to the WiFi, open the GlambotApp:
- Tap on the left bottom button and tap on “Robot Arm Settings”.
- On that screen, turn ‘on’ the “Use robotic arm” and “Use wifi for connection” toggles.
- Turn ‘off’ the “Detect IP automatically” toggle.
- Tap ‘on’ “Initialize Robot”.
The robot will switch from a solid blue light to solid green indicating “all good”. If you see a red light instead, make sure the “emergency stop” button is not pressed. You might need to restart the controller if it was pressed.
– Wired
To connect wired to the robot, turn ‘on’ the robot controller and wait until the controller LED is blue. After, open the GlambotApp:
- Tap on the left bottom button and tap on “Robot Arm Settings”.
- On that screen, turn ‘on’ the “Use robotic arm” toggle.
- Turn ‘off’ the “Use WiFi connection” toggle.
- For the other toggles:
- If you’re using a router, set ‘off’ the “Detect IP automatically” toggle and enter as “Ethernet IP”
192.168.0.110 - If you’re directly connecting the robot to your USB hub (not using a router), turn ‘on’ the “Detect IP automatically” toggle.
- If you’re using a router, set ‘off’ the “Detect IP automatically” toggle and enter as “Ethernet IP”
- Tap on “Initialize Robot”.
The robot will switch from a solid blue light to solid green indicating “all good”. If you see a red light instead, make sure the “emergency stop” button is not pressed. You should be able to play with the “Position: X” buttons to check if your robot is moving.